MAIN CHARACTERISTICS
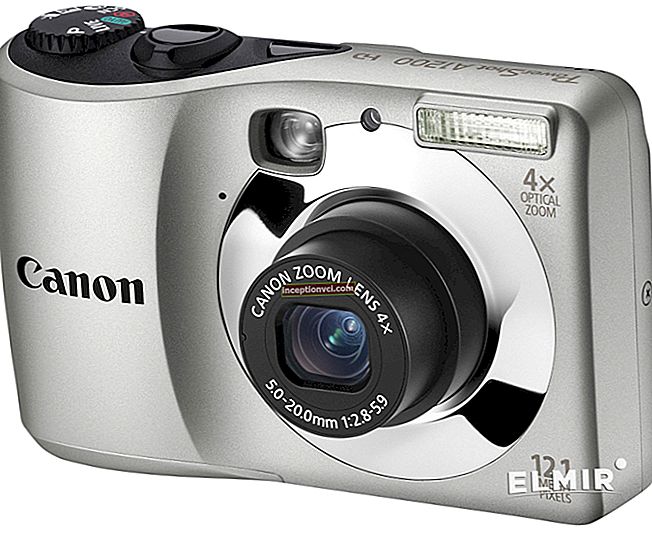
The matrix | 12.3 megapixels; resolution - 4032x3024 pixels; optical system format - 4/3 (physical size of the sensor - 17.3x13.0 mm) |
Lenses | Micro-4/3 system. The rest are installed through a special adapter. 2x focal length ratio. Whale Zuiko Digital 14-42 took part in the test F/3.5-5.6 MSC II R. |
Memory card | SD / SDXC / SDHC media, Eye-Fi support |
Monitor | 3 inches, 460K pixels, aspect ratio 16: 9 |
File format | JPEG, RAW (compression standard - ORF), JPEG + RAW; video - AVI (Motion JPEG) up to 1280x720 @ 30p, AVCHD up to 1280x720 @ 60p or 1920x1080 @ 60i, with stereo sound |
Interfaces | Shared USB / AV-out, micro-HDMI |
Dimensions | 110x64x37 mm (as declared by the manufacturer, body without protruding parts and lens) 119x66x91 mm (with lens 14-42 in transport condition) 119x66x112 mm (with lens 14-42 in working position) |
Position in the lineup | Between junior E-PM1 and senior E-P3 |
In 2011, Olympus launched 3 PEN mirrorless cameras at once - E-PL3, E-P3 and E-PM1. The main characteristics of all models are the same. They share the same 12 megapixel 4/3 (Four Thirds) CMOS sensor. Identical 2-core TruePic VI processor for good camera performance in all modes. Its computational power, coupled with MSC lens design and double the readout speed (120 times per second), has allowed the company to declare the creation of the "fastest" autofocus system (among all cameras with a 3x zoom lens). All three models share a similar menu system and control logic. There are artistic filters (processing effects) and a simplified mode (control of important parameters adjusted for beginners), video recording is carried out in Full HD, the range of photosensitivity lies within ISO200-12800, and the body is equipped with an optical image stabilization system on the matrix shift (any installed optics becomes stabilized)
I have already worked with the flagship PEN-EP3. I plan to test the younger E-PM1 together with Nikon V1. And now I'm going to tell you about the PEN E-PL3. Despite the fact that this model in the line takes the middle position, in certain parameters it surpasses even the older E-P3 camera. To begin with, I will give the main differences between the PEN E-PL3 and its predecessor:
- Swivel display (Olympus E-P3 has a fixed screen).
- Monitor with a resolution of 460 thousand pixels, with an aspect ratio of 16: 9, LCD technology (the E-P3 has a resolution of 614 thousand pixels, a ratio of 3: 2, OLED technology).
- No built-in flash (tiny flash supplied as standard).
- Continuous shooting speed has increased decently (5.5 fps versus 3 for the E-P3).
- Sync shutter speed is longer (1/160 vs 1/180).
- Only one rotary control (navipada dial). The vertical cylinder that was in the E-P3 is now gone.
- There are now fewer programmable buttons - four.
- There is no horizontal sensor (electronic level).
- There is no orientation sensor, the pictures have to be rotated independently.
- Less Art Filters - 6 versus 10; although only the best are selected.
- Lack of a handle, a protrusion on the front panel.
Almost all of the differences lie in the area of ergonomics and functionality. It is quite possible that the quality of the generated image will be identical to that of the previous model (or very close to it).
CONTROLS AND DESIGN
The design is austere and austere, but the camera looks elegant and stylish. Externally, the PEN E-PL3 is somewhat similar to the compact Olympus XZ-1.

There is no grip on the front panel, or even a minimal squeeze under the right hand, so the grip was not very reliable. An orange AF-assist lamp is located in the upper right corner of the panel.
The E-PL3 has a swivel monitor that the E-P3 and E-PM1 do not have. Thanks to this, the thickness of the case has increased (compared to the E-P3) by a couple of millimeters, but the width and height have become noticeably smaller.

Another factor that determined the slightly thicker device is the bayonet ring protruding above the body. You may have seen a similar design in Sony NEX cameras.

The E-PL3 borrows a lot from the image of the NEX models - both the design of the swivel monitor and the miniature external flash included in the package. By the way, the E-PL3's flash does not have a screw fixing, as in the NEX, and therefore it is installed much more conveniently and faster. At the same time, the contacts of the "hot shoe" port on the top plane of the camera and the accessory interface on the rear panel are involved (in the illustration below, it is covered with a protective cover with the manufacturer's inscription; by the way, this cover is monolithic and simultaneously covers both connectors). It is a pity that the camera didn’t take over the protruding handle, with which the grip of the device would become much more reliable.

By the way, there is nothing wrong with borrowing concepts and ideas. This practice is very common. Olympus engineers were the first to use: Live View mode, sensor shift stabilization, a system of ultrasonic vibration cleaning of the matrix from dust, artistic filters (processing effects built into the device). Gradually, these features were borrowed by other manufacturers.

Two keys located on the beveled edge of the rear panel have different functionalities depending on the current mode.
When viewing images, they are responsible for the display scale. When taking a photo, the right button (magnifying glass icon) displays an enlarged view of the AF area. The left button labeled "Fn" can be reprogrammed (like the other three keys).

The button with a dot in the center is the second that can be programmed. By default, it activates (and stops) video recording. Using the menu, you can also select other functions: setting the WB pattern with one touch, aperture repeater (preview of depth of field), manual focus, control of scene programs for underwater shooting (can be shot only with a special box), four custom settings, file format (JPEG + RAW or simply JPEG), test photo without saving to removable media, screen backlight, AEF / AEL lock, digital tele-converter, Photo Guide mode.

The INFO key usually scrolls through the ways of displaying information on the monitor, although sometimes it also serves to activate additional functions specific to the selected mode. The MENU key calls up the in-camera menu. Both of these keys are too small, and are made flush with the camera panel, so it is rather difficult to find them by touch, only the perforated Navipad disc can serve as a reference point.
Two navipad buttons have strictly fixed functions. The "Left" button is used to switch the focus area option, and the "Up" button is used to enter exposure compensation.
Down and Right buttons can be reprogrammed. Available options: Flash Mode (default to Right Button), Shutter Mode (Single Frame, Continuous Shooting, Self-Timer; Defaults to Down Key), Light Sensitivity, White Balance, Movie Recording Button Lock (red point), Exposure compensation.
OSD DISPLAY CONTROL SYSTEM

When shooting, the display modes are switched with the INFO key. Firstly, it is a clean frame without any overhead information. Only when you press the shutter button halfway does a green frame (or frames) appear, indicating the area in which autofocus was triggered.

In the second mode, different information is displayed on the edges of the display regarding shooting parameters and current camera settings. For a progressive user, this mode, I think, will be the main one.
Since the aspect ratio of the Olympus is 4: 3 and the E-PL3 is 16: 9, there are wide vertical black bars on the left and right. When information is displayed on them, the image on the display hardly overlaps.

When you press the buttons to which individual parameters or functions are assigned, you proceed to change the values of these parameters. Let's say that when you press the Down button on the pad, you get access to the shutter mode selection. The "Right" button allows you to set the flash mode (which will work only if an external flash is attached to the camera).

The functions of the Navigation buttons "Right" and "Down", which I just mentioned, are assigned by default. In the menu, you can change these functions, as well as the functions of the "Fn" and "Record" keys. For example, choose fast ISO input (illustration above). Thus, the camera has four programmable keys.

The next mode contains fewer parameters to display, but as an excuse we can say that a live histogram appears. As has been the custom in Olympus cameras for a long time, white indicates the distribution of brightness throughout the frame, while green indicates the AF area.
But here an unpleasant surprise awaits you. When exposure compensation is entered, the live histogram disappears from the screen and returns only after you have entered a specific value. In addition, the histogram does not take into account the entered exposure compensation at all and remains unchanged. But the very meaning of the histogram is precisely to see how the scene being shot fits into the brightness range, taking into account the set exposure parameters. The image on the display also does not respond to the input of the exposure shift, and, as a result, does not simulate the result of the current brightness.
Actually, I have seen such a strange approach more than once in modern cameras, but Olympus has always been among those who did everything correctly and reasonably - if we talk about the logic of work and ergonomics.

If you press the INFO key while entering the exposure shift, you will be able to adjust the brightness separately for dark and light parts of the image; formally, this is a tonal curve adjustment (enlarged fragments of the lower right corner of the image). A unique and rare opportunity.


There is a way to display information when underexposed fragments (too dark) are highlighted in blue, and overexposed in red.
Another option is the visual input of the exposure shift (or, after pressing the "Up" button, the white balance - the illustration above). Four thumbnails are displayed, each simulating an image when configured accordingly.

Maybe for novice photographers, this option will seem clearer, but believe me - in practice, especially in bright sunlight, it is difficult to estimate from the image which WB and exposure compensation will be more accurate.

Pressing the center OK button on the navipad takes you to the OSD menu. The left parameter column disappears, and the right one is activated. Select the required parameter (using the "Down / Up" navigation buttons), and immediately change its value - the lower part of the screen (using the "Right / Left" buttons, or with the navipad dial).
I draw your attention to the options that use face recognition - priority of face, face and eyes, face and left eye, face and right eye.

While in the OSD menu, you can press the INFO key - then the control panel ("Super Control Panel") is turned on on the screen. All the most important parameters are displayed at the same time, their values can be changed directly on the screen (including the selection of the AF point).
In the menu, you can choose whether the control panel will work. If the list of display methods seems too large to you, then you can remove unnecessary options from the enumeration, in the menu.
As with the older E-P3 model, the E-PL3's configuration options are extremely wide.


By pressing the key with the magnifying glass icon, the zone in which the autofocus was triggered increases (on the screen it is indicated by a green rectangle) several times.

You can select the scaling factor (there are four of them): 14x, 10x, 7x or 5x.Strangely enough, this does not involve two zoom buttons (as it was done in the playback mode, when the right button enlarges the picture, and the left one reduces it). Only the right key works - it selects the scale that was last time. Pressing it again (or the OK key) returns you to the normal display. If you want to change the scale, you first need to press the INFO button, and only then select the required value. Awkward enough and very illogical.
Using the navipad buttons, you can move the enlarged area over the frame area.

Navigation button "Left" is used to select the focus area. The Olympus E-PL3 has a total of 35 zones located in the center of the display in a 7x5 square matrix form. Pressing the INFO button switches two sub-modes - the choice of the type of autofocus (single zone, 3x3 group or all 35 zones), as well as moving the selected zone across the screen area. Here you can also select the face recognition mode (priority of eyes, faces, etc.).

The autofocus area can be moved either with the navigation buttons or by turning the ring. When crossing the border, “Multi” turns on (all 35 zones), then the zone (or group of zones) appears on the other side of the screen.

The whole system takes some time to get used to, but there are always few clicks, so AF can be set up quickly enough. However, with the touch screen, which is available in the older model, the process is even faster.

The latest three models in the PEN range feature the new F.A.S.T. The high speed that is observed when using lenses native to these cameras is achieved due to a combination of certain factors - twice increased (120 times per second) read speed, advanced focusing algorithms with MSC optics, as well as a dual-core structure of the TruePic VI processor (one the processor is fully focused on AF).

The autofocus speed of the E-PL3 with the kit lens 14-42 is very fast. The speed slows down a little when approaching telephoto, but, nevertheless, it is at least at the level of junior (and even medium) DSLRs with whale optics, and fast Panasonic mirrorless cameras. In low light conditions, the speed also slows down.
SHOOTING MODES, SCN, ART FILTERS

The shooting modes of the Olympus E-PL3 are switched by turning the "iron" dial on the top of the camera. There is a full set of standard exponents - PASM.
In smart machine mode, the list of available options is severely reduced. When you press the OK key, the PhotoGuide interface appears (not the on-screen menu), designed to make life easier for a novice photographer. On the right side, in a vertical column, various icons are displayed. With their help, you can change the color tone and saturation of the picture, blur the background (by changing the aperture), adjust the brightness and "dynamic scene" (this, of course, setting the shutter speed).

You can't get away from standard exposure parameters. In reality, you still set the aperture, shutter speed, and the like. The terms are simply named with simpler words ("blur the background", etc.).

Upon closer examination of the "change brightness" item, I found out that it turned out to be complex - apart from the fact that exposure compensation is introduced here, you can also adjust the brightness separately for dark and light parts of the image - adjust the tone curve, which I mentioned earlier. This feature is very interesting in itself, and it's surprising that it is in the Photo Guide mode - where, I think, is not the place for advanced modes and tools.
In Smart Auto mode, there is a small tutorial with hints and tips for shooting techniques. Everything is good, but there are very few of them.


By setting the dial to the ART position, you turn on the art filters mode. There are six of them in the Olympus E-PL3.In my opinion, the best filters have been chosen, allowing you to really diversify your shots and get unique effects directly from the camera, without post-processing on third-party editors.


The filters have been improved in comparison with the previous cameras in the PEN line. Pressing the Right Navigation button provides access to additional options. There are filters that have options - color tint, lower and higher contrast. You can add a Starlight effect and a frame. Some filters can be combined - for example, combine Soft Focus and Pop Art.


Take a look at how art filters work in the following photo.


Most artistic filters are "macro" in nature, in other words, the result of the work is visible in the image as a whole. But some, you need to enlarge to see the structure that the image acquires:


The "Diorama" filter stands out a little against the general background. A very popular effect lately, it is often called "Miniature". The bottom and top of the image are blurred to achieve the shallow depth of field that is typical for macro photography. Choosing a setting for the diorama effect requires a particularly careful approach. The best way is to use an open panorama and a high angle. Otherwise, the effect will look bad.

Batch shooting in filter mode is of interest. Bracketing options include art filter bracketing. Separately for each filter, as well as for color styles, it is possible to set whether they will be in batch shooting or not. Bracketing is enabled with one checkbox with on / off positions. That is, if you use all the methods in the package, one click on the button records 13 images (6 filters and 7 color styles). You can also include a RAW file in batch shooting - it, of course, will be recorded in one copy, without any processing.

The subject programs hidden under the SCN dial position are fully automatic, and do not require the photographer to intervene in setting the parameters. The device takes care of everything and sets the most optimal parameter values for the current scene.

The list of scene programs is quite varied: Portrait, Portrait with skin texture smoothing, Landscape, Portrait + Landscape, Night Scene, Sports, Portrait + Night, Bright tone (in other words, high key), Movable children, Low key (low key), Macro photography , Documents, IS Mode, Candlelight, Sunset, Nature Macro, Wide Angle, Panorama (single shots, no automatic stitching), Beach and Snow, Fireworks, Fisheye, 3D Photos, and Macro.
Navigation button "Right" activates a short explanation of the selected plot.


VIDEO SHOOTING

Video recording can be started by first turning the mode dial to the desired position, or at any time using the red button, provided that no other function is linked to it. When recording video, a huge number of shooting parameters are regulated - aperture, shutter speed, light sensitivity, and the like. Image styles and art filters work. However, the settings must be made before the start of the shooting; during the recording process, there is no access to them. When the art filters are activated, the shooting frequency drops several times, up to a couple of frames per second, and the result can be called video shooting with a huge stretch.

You can also take still pictures while shooting video if the corresponding option "Video + Photo" is enabled in the menu. In this case, the video is split into separate files - captured before the snapshot, then the snapshot, and again the video. There is no need to re-enable video recording, everything is done automatically. The response of pressing the shutter is difficult to call instant.
Olympus E-PL3 records video in AVCHD format - up to a resolution of 1920x1080, or in Motion JPEG (aka AVI) up to 1280x720 pixels, with stereo sound.


VIEW MODE

In viewing mode, the amount of information displayed on the monitor is switched by the INFO button.You can display: only a snapshot, a snapshot with a small amount of information, a reduced frame with a histogram (individual channels) and detailed information, a large brightness histogram or flickering areas of deep shadows and highlights.


Of course, you can change the image display scale - two zoom buttons. Then, using the buttons of the navipad, you can move the enlarged fragment over the frame area.
Index display options, namely, how many frames will be included in the matrix on the screen, can be set in the menu. Possible options include a 2x2 matrix, 5x5 index images and output by shooting date (calendar display).
I really did not like the fact that in the index display, pressing the OK button does not switch to a single scale (one image on the screen), as expected, but immediately leads to editing a particular image. To go to the original view, you need to press the zoom button.


There are not very many editing options for already taken pictures, there is only the most necessary from the basic minimum.
In-camera conversion of files from RAW format to JPEG occurs in a standard way for Olympus - you do not perform parameter settings in some special menu, but simply issue the conversion command; the current settings of the device are used.
IN-CAMERA MENU

As with other Olympus PEN cameras, the customization options are very wide. I will briefly tell only about some of them, and the rest will be clear from the screenshots.
The in-camera menu is divided into 6 main sections - Shooting menu 1, 2; Custom menu; View menu; Settings menu; Accessory port menu (this can be disabled if not needed).

I already mentioned that the Olympus E-PL3 has Art Filter Bracketing. In addition, bracketing is possible for 4 more parameters - exposure, white balance, flash and light sensitivity.

The custom menu is the most extensive submenu. It consists of ten subsections, each of which is color coded for ease of navigation. When turning the pages, to go to the next subsection, you do not need to go to the root directory - the transition to subsections A-B-C-D ..... is performed automatically.
In addition to the navipad keys, you can navigate the menu by rotating the navipad dial.

The Button Function section helps you define the functionality of the four programmable keys.


By the way, when you press the MENU button, you are taken not to the same section with which you worked the last time, but to the beginning of the same section. Not the most logical decision. In my opinion, you need to either get to the same item, or let the user switch "the same item / start of the menu."


For the histogram, it is possible to determine which values will be perceived as shadows and overexposures in the output. Initially, these are 0 and 255, respectively, but you can step back 10 units at each edge.
For the Auto-ISO mode, not only the limit of possible values is selected, but also in which exposure modes this function will function - whether only in S / A / P, or in all together.


In the flash settings, you can choose whether the "flash exposure compensation" value is added to the "general exposure compensation", or used separately.
The intensity of noise reduction is adjusted, there is a white balance adjustment - independently for each preset, along two coordinate axes.


A wide system of settings for the resolutions used is standard for Olympus cameras. There are four options for JPEG files: 1,2,3,4 (RAW format can be connected to each). So, for each option, you can choose one of four levels of compression (Fine, Normal, Basic and SuperFine), as well as the image resolution - Small Middle and Large. In addition, Large always implies the maximum matrix, and for Smal and Middle, different options are possible.


For a couple of frames captured in JPEG and RAW formats, you can choose how the file erasing (deleting) procedure works.Only the RAW file will be deleted, only the JPEG file (in such cases, the second shot will need to be deleted again), or two files will be deleted at once.


For the 3 main metering options (Spot, Center-weighted and ESP), you can enter a constant compensation in 1 / 6th exposure stop increments.
You can also adjust the battery charge level at which the display shows a warning about the imminent discharge.
CONCLUSIONS AND ASSESSMENT
Benefits |
| |
disadvantages |
| |
Ergonomics | 8/10 | For the most part, the control system is logical and well thought out. However, certain aspects do not quite correspond to the level that I am used to seeing in Olympus cameras. A beginner photographer will find the interface simple, while an advanced photographer will find it extensive. A well-developed system of hints and a simplified "Photo Guide" mode. Very wide possibilities of configuring the device and adjusting it to user preferences. |
Functionality | 9/10 | Fast autofocus, excellent overall responsiveness, rotating display and Full HD video shooting. In some areas, the Olympus E-PL3 outperforms even the older E-P3 model, but there are simplifications. The most basic limitation is the lack of its own flash. |
Image quality | 9.5/10 | The Olympus E-PL3 takes great pictures. Moreover, which is very important for amateurs, the pictures appear as such immediately, without any post-processing, even when shooting in JPEG format. The picture looks especially good at low light sensitivity values, up to 1600. As it grows, the image starts to lag a little behind the leaders in this parameter (both mirrored and mirrorless). I also want to say that not so long ago, mirrorless cameras were released by Nikon and Pentax. Both manufacturers have a smaller physical sensor than Olympus.It will be interesting to see how they are doing with image quality at high ISO values. |
Price-quality ratio | 9/10 | Olympus E-PL3 is much cheaper than the older model E-P3, despite the lack of differences in basic characteristics - processor, matrix, autofocus, video speed. Very good value for money. |
Overall score | 9/10 | The Olympus E-PL3 is a great camera - rugged, stylish, easy-to-use, lightweight, responsive, with fast autofocusing, great shots. |