INTRODUCTION
The mirrorless device with an interchangeable lens Sony NEX-C3 has a large matrix (16 megapixels, APS-C format) and a rotating screen with a resolution of 920 thousand pixels. Capabilities and shooting modes include Scene Programs, Intelligent Auto (i-AUTO), HDR shooting, RAW file support, 720p HD MP4 Movie, Standard P, A, S, M Exposure Modes, One-Shot Panorama Shooting, V including 3D. The graphical interface is aimed at novice users - a wide system of on-screen tips and hints for shooting.
CHARACTERISTICS OF THE CAMERA
The matrix | 16.2 megapixels; picture resolution 4912x3264; sensor format APS-C (physical size 23.4x15.6 mm) |
Lens | Sony-E system. A Sony E 18-55 / 3.5-5.6 OSS lens took part in testing. Konica Minolta, Sony Alpha and Minolta lenses - through a special adapter, no autofocus capabilities. |
Memory card | SD, SDXC, SDHC or Pro Duo, Pro-HG Duo, MS Duo media. |
Display | 3.0 inches, 920 thousand dots |
File format | Photo - JPEG, RAW, RAW plus JPEG; video - MP4 resolution up to 1280x720 pixels at 30 frames per second (6 or 9 Mb / s), with stereo audio recording |
Interfaces | Shared AV / USB port, mini-HDMI, remote control connector |
dimensions | 110x60x33 mm (according to the developer, the body is without protruding parts) 115x63x100 115x63x (94-117) |
Positioning in the ruler | Between the younger NEX-3 (my review) and the older NEX-5 |
Recently, in my review of the NEX-5, I talked about the term denoting this class of cameras. At that time they were called "non-mirrorless cameras" - but as a result of the realization that the Russian tradition of translating foreign terms literally "head-on" led to the fact that the English "mirrorless" began to be translated as "mirrorless". As a result, the term "mirrorless camera" became common.
By the way, recently in English-speaking countries, the abbreviation of the words mirrorless interchangeable lens camera (MILC) is more often used to denote this type of device. Even more interesting is the second abbreviation (electronic viewfinder interchangeable lens) - EVIL, which is written and sounds like "evil". Although, in the Russian language, such ambiguities have not yet been encountered - just "mirrorless cameras".
Nowadays, probably everyone knows the main advantages of mirrorless cameras - a combination of a large-format matrix (like in ordinary SLR cameras), the ability to reinstall the lens (based on specific photography goals) and, to a certain extent, small size (compared to DSLRs). The previous camera in this lineup, the NEX-3, was the smallest of all mirrorless cameras at the time of its release. So the NEX-C3 is even smaller in size.
However, this only applies to the case; the kit standard lens 18-55 / 3.5-5.6 greatly increases the size and weight of the device, so that it is not a record small. I believe that the whole war for millimeters does not carry much sense - all mirrorless cameras, in most cases, can be attributed to the same size-weight group - less than DSLRs, but not enough to fit in a pocket.
The main difference between the NEX-C3 and the previous model is the new matrix with a resolution of 16 megapixels. In addition, the interface system has been improved to a certain extent, special processing effects have been added, and the Creative Control mode, in which help related to the settings of important shooting parameters is given in a language that is understandable and simple even for a child. According to the developer, the power consumption has dropped by 20%, but, to be honest, the battery runs out rather quickly, and buying a second (and maybe a third) battery seems to me very desirable, especially with intensive use of the camera.
CONSTRUCTION AND DESIGN
Devices of the NEX lineup do not have a built-in system of optical stabilization based on sensor shift, therefore stabilization is assigned to the lens.You might think that such an ideology for developers is not fundamental, since the matrix shift is still used in Sony Alpha DSLRs. Simply in NEX cameras, minimizing the size of the body was the first priority, and the gimbal no longer fit.
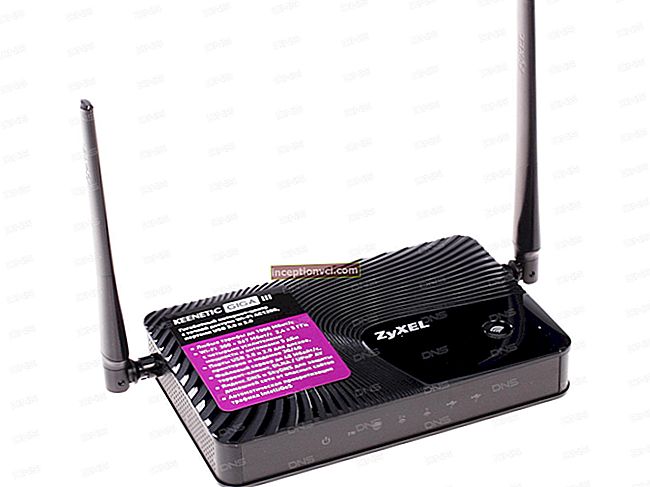
The Sony NEX-C3 turns out to be particularly compact when paired with a so-called pancake - fixed-lens (24 equivalent mm focal length - image above). Despite this, zoom lenses will be more popular, especially among amateur photographers. Namely, the "whale" classic 18-55 / 3.5-5.6, they were used in my testing (illustration above).

In this case, the situation changes slightly. The smallest thickness of the device (in the transport state - the lens retracted and the cover on) is 100 mm. This size should be guided by when buying a bag, or trying to fit it into your pocket (if at all possible).

The shutter release button is located at the top of the camera, not on the handle, at a slight angle, as is done in the NEX-5. In addition, the handle of the NEX-C3 is also significantly smaller. As a result, the device is not comfortable enough in the right hand - at the level of an average compact. I believe that the developer overdid it in miniaturizing the case - besides, it is not clear why to win these 1-2 centimeters, the overall dimensions of the device are still determined by the lens.
The impressive dimensions of the 18-55 lens make you hold the camera with your left palm under the lens, your thumb to the left - as when holding an SLR camera. That's when everything falls into place! The frame of the lens is a material, which is metal, solid and pleasantly in the hand, both rings with perforated coating, turn conveniently. The narrow ring is for manual focusing, while the wide ring is for zooming.
Despite the fact that the full name of the Sony Alpha NEX line contains the word Alpha, the mount is directly incompatible with the lenses of the Alpha line DSLRs. NEX cameras use a different mount called Sony E. In addition to Alpha lenses, Konica Minolta and Minolta can be attached using the dedicated LA-EA1 adapter, but focusing in this case is manual only.
At the moment, there are only 4 lenses in the Sony E line. In addition to the already mentioned 18-55 / 3.5-5.6 OSS and 16 / 2.8, the recently announced 30 / 3.5 macro lens and the 18-200 / 3.5-6.3 OSS universal zoom lens. An expansion of the Sony E line is expected in the near future - but I honestly doubt it.
The built-in flash of the NEX-C3, like in the previous NEX models, is absent, but an external flash is saved (included in the standard package). Although, this approach is welcome - the built-in flash of compacts is still too weak. Head-up flash photography is often unacceptable.
The flash is connected to the connector on the top of the camera (in the instructions it is called “smart connector for accessories”) and is fastened with a screw - very inconvenient. It's hard to imagine how you will constantly unscrew and screw the flash. I believe that it would be better to remove the flash altogether and rely on a large matrix that allows the sensitivity to be raised to fairly high values.

The external flash is not equipped with its own battery (in this aspect it is not really "external"), and is powered by the camera battery, increasing its discharge.
The display can be tilted up, approximately 80 degrees, or lowered by 40 degrees. It rotates only along one of the axes - geometrically only up and down rotation, but in a constructive sense there are two axes. There are no left-right turns, but this is insignificant, because the need for them arises less often.

The video recording key is located at the junction of the back and top panels. At first glance, the location seems apt. But if you take the device in hand, you will notice that it is impossible to simultaneously hold the thumb of the right hand on the video recording button and the index finger on the shutter release. To start video recording, you need to intercept the camera by tilting your hand forward (strong enough). A movie-record button on the back would be much more convenient.

The number of governing bodies is minimized. It may even appear that the camera is using touch controls; but no, the display is the most common.The navipad disk rotates and is pressed in 4 directions, in the center there is an unnamed button. Two more keys, also unnamed - due to the fact that they are reassignable, and the functions they perform can be changed.

A tripod socket made of metal, is located on the same axis with the lens. This can play a positive role when shooting panoramas.
The removable drive is installed in its own compartment, not adjacent to the battery compartment. Perhaps this contributed to the miniaturization of the camera. As a result, the memory card cannot be changed if the unit is mounted on a tripod.

Nowadays, 2 polar tendencies in management and design are noticeable. A striking representative is the Fujifilm X100 model. Old-fashioned, and so to speak traditional solutions, many metal controls for quick and easy access to control parameters. The Nikon P7000 (my review) and the Canon G12 (my review) are built on the same principle, albeit not so eccentrically. The perfect opposite to this approach is the Sony NEX camera. The exterior does not rely on traditions that have formed in the photography industry over the course of decades. The company is engaged in the development of electronic devices of the 21st century, designed for photography (not only). Sony NEX cameras are very modern, aggressive, youthful.
To help the user enjoy the shooting process, the screen displays a rich, effective, completely unrealistic image (even if using the Standard creative style). Almost any picture - a street with parked cars and houses or objects - looks tasty and juicy on the screen. It's a pleasure to look at them!
CONTROL (FIRST PART)
The rotary camera power activator is located on the top panel, under the shutter button. Nearby there is a View / Play button, designed to turn on the mode of viewing the captured photos and videos.

Using the key with a red dot in the center "MOVIE", you can call up video recording at any time, there is no need for a special activation of the video mode.
The display is large, moreover, it is stretched along the horizontal axis. As a result, there is little room on the back of the camera to accommodate controls. There are four of them - 3 buttons and a navipad disk (or a perforated ring, as you like).
The control system uses the contextual principle - the functional assignments of the keys are not constant, depending on the active mode, they change. On the right side of the screen, labels are displayed that indicate the current function of the key. They seem to have a kind of dual structure - as if iron, but at the same time virtual.
Since the buttons do not have fixed labels (including icons on the panel), I will call them "Bottom", "Center" and "Top".

Both buttons on the navipad - Down and Up - with fixed functionality. The Up button (labeled DISP) changes the way information is shown on the display. For the shooting mode, there are only 3 options.
The absence or presence of a histogram is determined not by the DISP key, but in a separate item in the menu.

The display of all parameters is passive, in other words, the values cannot be changed directly from the screen, you need to plunge into the menu (in addition to those that are controlled directly by the Navipad buttons, but I will talk about them a little later). It turns out that the device lacks what I call the on-screen menu - any system for quick access to the displayed parameters and their change.

If, when looking at the illustration, you have a little dazzle in your eyes, then everything is correct, in practice, approximately the same thing happens. Despite the rather small graphics (but very neat and nice), there is a lot of information. However, of course, the main role here is played by the subject and the lighting conditions.
I draw your attention to the fact that the battery charge level is indicated on the display directly as a percentage (top line). Very comfortably.

When the shutter is released halfway, green corners indicate the area (s) where AF was activated.However, a green dot is shown in the lower left corner. If the photosensitivity is set to automatic, the ISO value determined by the automatic camera is not indicated, the only way to find it out is the shooting parameters.

The bottom navipad button is intended for introducing exposure adjustment. Correction is entered either by turning the dial, or using the Down-Up buttons.
It is a pity that at this time the histogram disappears from the screen, and for that reason it was conceived to provide accurate entry of exposure compensation.

In shutter priority S and aperture A mode, the navipad dial controls the corresponding parameter (shutter speed and aperture).
In manual exposure mode, M controls the shutter speed by default, and after pressing the Down key, the aperture. It is curious that in this mode the histogram does not disappear from the screen, in contrast to the usual input of exposure compensation.


Navigation buttons Right and Left programmable. By default, they do not perform any functions, I assigned them to control light sensitivity and WB. Press the button, a segment of the disk (animated) containing the parameter values appears on the right side of the display. Immediately, without lifting your fingers, you can turn the dial and select the desired value.

The range of ISO sensitivity ranges from 200 to 12800, at the maximum image resolution.
Manual mode M does not allow setting Auto-ISO, it is imperative to set a specific value.

The default bottom key on the back of the camera allows you to use the built-in hints and tips for shooting. There are a lot of tips as such - 86 pages. Especially considering that one page takes up two or three screens.


The pages are organized into groups of shooting modes and themes (Night views, Portraits, etc.). There are also general guidelines - how to hold the camera, compose the shot, and the like. In addition, when you press a key, tips that are specific to the active mode are displayed on the screen, but you can also read the entire user manual in a row by calling it through the menu. A rare and useful feature.

In addition to the Right and Left navigation buttons, 2 more buttons are programmable, the function they perform is set in the menu.
The bottom key is called the B Key, and the button in the center of the navipad is called the C Key.
Undoubtedly, the programmable buttons expand the control of the camera. But I will evaluate the control system in general a little later.